

Locker Installation Guide
Step by step guide to installing your lockers
Safety First - Do's & Don'ts
Before you start installing your lockers, check the following:
DO install on a strong, level and even surface
DO make sure the locker base is flush with the floor
DO ensure all screws are tightened on completion
DO check the suitability of the wall before fitting
DO ensure the area to be drilled is clear of hidden electrical wires, water or gas pipes
DON'T use if any parts are missing, damaged or worn
DON'T use until all fixings are secured
DON'T attempt to lift or move lockers unaided
DON'T use locker until installation is complete
Tools Required
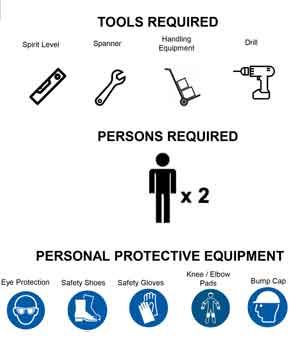
For your locker installation you will need: a spirit level, spanner, drill and handling equipment. Ideally two people are required to do an installation. They will need eye protection, safety shoes, gloves, knee/elbow pads and helmet.
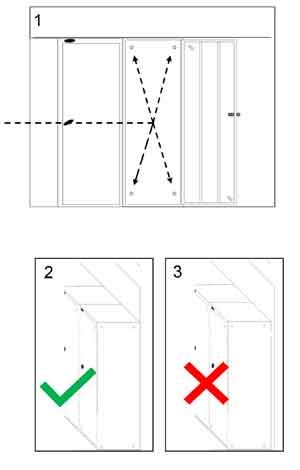
Positioning & Configuration of Lockers

REMEMBER to remove the keys from the underside of the locker base before positioning the locker where it is going to be installaed.
Lockers ideally should be secured to ensure stability and single locker nests should be fixed back to a wall. Runs of lockers should be fixed together side to side and then fixed back to a wall or back to back to another run of lockers.
A single run of lockers must be secured to a suitable anchor point with a suitable bracing mechanism.
Lockers on stands or seat/stands should be fixed down to the stand or seat/stand as well as side to side and back to a wall or a run of lockers.
Securing Lockers
Run Of Lockers - Runs of 1 or more lockers must be fixed together side by side. Make sure the unit is securely in position and bolt together side by side. Use 4 no. 6 x 12mm nuts and bolts into the 4 locations within the locker side panels and hand tighten. All fasteners must be tightened with appropriate tools after first assembly is completed.
Securing To A Wall - Using fasteners suitable for the type of wall, fasten each locker to the wall using the holes provided (fixings not provided with locker as we don't know the makeup of your wall).
Fixing Back To Back - Ensure the unit is securely in position and bolt together side by side. Use 4 no. 6 x 12 mm nuts and bolts into the 4 locations within the locker side panels and hand tighten. The top two mounting holes must be used to safely fix the locker into position.
Obstructions
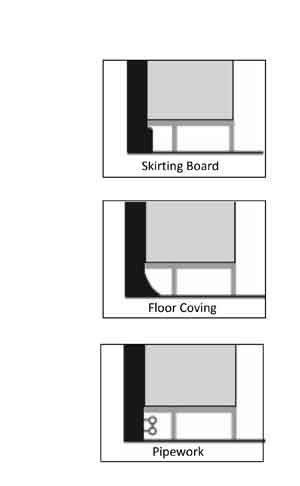
If the lockers are impeded by skirting boards, floor coving or pipework, stands can be used to raise the lockers clear of the obstruction. The rear leg of the stand can be inset to avoid the obstruction.
If wall fixing lockers, they can be fixed directly onto walls or on to wall-fixed timber battens. Timber battens can be used on irregular wall surfaces or if the lockers are positioned in front of a skirting board. This leaves a gap between lockers and the wall.
The top batten is used to prevent items falling down the back of the locker and the bottom batten is used to secure the locker back to the wall.
Looking After Your Locker
Locker fixings may occasionally become loose. It is important to regularly check exposed fixings and re-tighten where necessary.
Cleaning of Lockers - Steel lockers have a high quality paint finish. All that is required is a wipe with a duster or soft cloth. Do not use solvents.
Damaged doors or locks should be replaced as soon as possible so security is not compromised. Speak to a member of our sales team to request any replacement items.